使用github pages和hexo搭建自己的博客
我搭建博客的一个简单记录,使用 github pages 和 hexo 搭建的。
如果没有安装 node.js,git 的话要先安装
安装 hexonpm install hexo-cli -g
升级
修改 package.json
{ |
首先登录 Github 创建一个代码库,username.github.io
搭建基本的环境
安装 Node
安装 Hexonpm install hexo-cli -g
安装 git
新建立一个空目录用来放博客文件hexo init
生成目录如下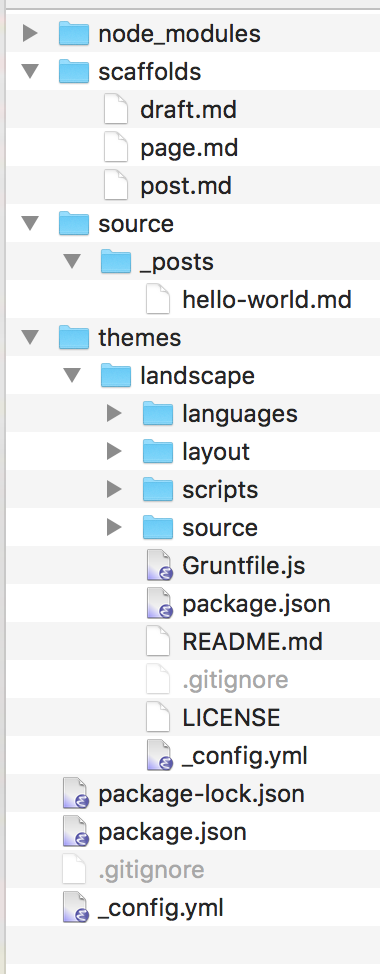
目录说明:
- node_modules: nodejs 模块所在的目录,比如 hexo 相关的模块
- scaffolds: 新文件模板目录
- source: 博客主要的源码目录
- posts: 文章目录,我们现在在里面能看到一个 hello-world.md 的文件,这就是我们的第一篇文章
- drafts: 草稿目录(这里还未生成)
- data: 博客的数据目录(这里还未生成,但是有些 Hexo 的插件会使用)
- themes: 博客的主题目录
执行命令hexo s,就可以打开网页查看了http://localhost:4000/
生成一个静态博客hexo g执行后会生成一个 public 的目录,这里面就是静态博客的内容了
| 完整命令 | 简写指令 | 备注 |
|---|---|---|
| hexo init | hexo 初始化 | |
| hexo clean | 清楚旧的 public 生成文件 | |
| hexo generate | hexo g | 生成 public 静态文件 |
| hexo server | hexo s | 本地 |
| hexo deploy | hexo d | 部署到 GitHub |
升级 hexo
npm update -g
npm i hexo-cli -g
配置
config.yml 文件可以配置博客相关信息
一定注意:在 yaml 文件中,冒号后面一定要留一个空格,不然加载的时候会报语法错误。
安装 hexo-deployer-gitnpm install hexo-deployer-git --save
配置 Github 仓库信息
# Deployment |
评论系统
在主目录的_config.yml 里面添加如下配置 |
部署注意
git config --global user.name "yourName" |
打开刚刚生成的 pubkey,copy 内容
在 github 里面添加 ssh key,然后执行下面命令验证是否成功ssh git@github.com然后就可以使用hexo d发布了
写文章
添加博客其实非常简单,我们只需要在source/_posts目录下创建一个 markdown 的文件就行了。不过为了我们更加方便创建和管理所有的文章,hexo 还提供了一个命令来完成这件事情:hexo n post
并且在_config.yml 中还提供了一个配置来设置新文章的文件名字。new_post_name: :year-:month-:day-:title.md
hexo n "我的博客" |
##更换主题
Hexo 基本所有的主题安装流程都差不多,我现在用的主题是 hexo-theme-next(https://github.com/iissnan/hexo-theme-next),安装它只有几步:
1 在博客根目录下执行如下命令git clone https://github.com/theme-next/hexo-theme-next themes/next
2 修改根目录下的_config.yml,即可。theme: next
最好使用hexo clean清除一下缓存
然后重新生成
hexo g |
hexo server #Hexo 会监视文件变动并自动更新,无须重启服务器
hexo server -s #静态模式
hexo server -p 5000 #更改端口
hexo server -i 192.168.1.1 #自定义 IP
hexo clean #清除缓存,若是网页正常情况下可以忽略这条命令
配置 SSH 私钥使用多个 github 账户,创建或修改 config 文件
C:\Users\username\.ssh\config |
使用时
git remote add origin git@github01:username.github.io |
绑定域名
在 source 目录下创建 CNAME 文件
内容是域名信息zhengjunblog.top
检查域名是否生效
键入 ping+空格+您的域名(如:www.net.cn)
nslookup www.aliyun.com
设置完域名不生效就清除一下 dns 缓存sudo killall -HUP mDNSResponder
ping MeZhengJun.github.io
151.101.77.147
185.199.109.153
185.199.111.153
阿里云 DNS 解析
CNAME 的@记录和 MX 的@记录不能共存问题
由于我的域名开通的时候,自动开通了企业邮箱,因此,在域名解析那里,阿里云自动生成了几条和邮件相关的解析记录
首先使用 ping 命令看一下自己的 github pages 的 IP 是多少
然后添加 A 类型解析,主机记录@,记录值是上面查到的 ip 地址
如果 github 的 ip 有变化了,就解析不到了。需要重新设置一下
CNAME 文件的用处,把域名和项目进行绑定,当访问域名时,DNS 解析到 github 的 IP 时,由于请求头中会带有域名信息,github 通过 CNAME 的绑定,查询到了你具体的项目,才能正确找到你的项目。
black-blue 主题
http://geeksblog.cc/hexo-theme.html
安装常用插件,建议全部安装
图片
npm install https://github.com/CodeFalling/hexo-asset-image --save |
如果使用 fancybox 就显示不出来图片
images viewer | 图片浏览器
http://www.fancyapps.com/fancybox/
fancybox: false
## rss插件 |
百度 url 提交插件
修改站点配置文件_config.yml 增加以下内容:
baidu_url_submit: |
检查站点配置文件里 url 设置
url 必须和百度搜索资源平台里的域名保存一致
... |
修改站点配置文件里 deploy 项
deploy: |
新链接的产生,hexo generate 会产生一个文本文件,里面包含最新的链接
新链接的提交,hexo deploy 会从上述文件中读取链接,提交至百度搜索引擎。
博客全局配置,修改根目录下_config.yml
Plugins: |
rss 设置
feed: |
本地搜索插件集成
npm install hexo-generator-search –save
本地搜索配置
search: |
站点地图,seo 搜索引擎需要
sitemap: |
主题配置
按修改时间排序
在网站的_config.yml配置一下就可以了需要如下的插件,貌似自带了 |
文章置顶
置顶插件
然后在最顶端的描述部分写上 top: 1 即可,后面的数字越大优先级越高
npm install hexo-generator-index –save
https://github.com/hexojs/hexo-generator-index
修改根目录下的_config.yml 文件
修改 generator.js 文件
修改 node_modules\hexo-generator-index\lib\generator.js 文件。
这个文件是控制生成文章的顺序的。修改成按 top 排序。没有 top,则按时间来排序。
文件内容如下:
'use strict'; |
增加 top 和 sticky 属性
sticky 是让 next 主显示图钉样式的。
top 是来定义顺序的。
如
--- |
首页文章显示摘要
--- |
数学公式
启用Mathjax插件 |
站点配置文件
math: |
主题配置文件
mathjax: |