flask email service学习笔记 使用flask搭建一个邮件服务。提供RESTFul类型的api接口。接收,返回JSON数据https://youtu.be/PsCGu52T98I http://v.youku.com/v_show/id_XMzAwODM5ODU2MA==.html?f=50944544 https://github.com/aslucky/mailService.git
POST 创建新任务-发送邮件
http://[hostname]/api/v1.0/emails
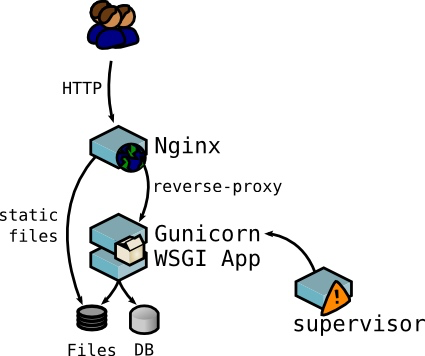
Flask工作流程
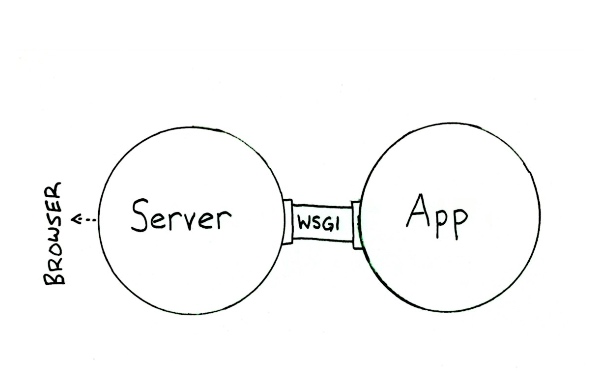
WSGI:Web Server Gateway Interface,看图好理解一些,就是个中间件规范
用到的技术:nginx+gunicorn+celery(RabbitMQ)+flower+Supervisor+python3+loggingflower :Flower是基于web的监控和管理Celery的工具.
实际部署的时候,只需要运行nginx+supervisor就可以了
搭建开发环境 这里使用的是anaconda所以使用conda来创建一个python3.6.x的虚拟环境
安装nginx,这里没有详细记录步骤,中间可能会遇到问题,网上搜索一下就可以解决了
brew update
brew install nginx
# 安装RabbitMQ
brew install rabbitmq
# 查看一下现有虚拟环境
conda env list
# 创建一个python3的虚拟环境
conda create --name flaskMailPy3 python=3.6.2
# 激活虚拟环境
source activate flaskMailPy3
# 安装flask
pip install flask
# 安装flask-mail扩展
pip install flask-mail
# 安装gunicorn
pip install gunicorn
# 安装celery
pip install celery
# 安装flower
pip install flower
# 安装supervisor
pip install supervisor
使用nginx # 查看安装信息(经常用到, 比如查看安装目录等) brew info nginx # 启动nginx服务 brew services start nginx # 关闭nginx服务 brew services stop nginx 重新加载nginx nginx -s reload nginx 停止 nginx -s stop # 查看所有进程监听的端口 sudo lsof -i -P | grep -i "listen" # 查看某个端口是否被占用 lsof -i:8000
利用http://localhost:8080进行访问
server {
        listen       8080;
        server_name  localhost;

        #charset koi8-r;

        # access_log  logs/host.access.log  main;

        location / {
            #root   html;
            #index  index.html index.htm;
            proxy_pass http://127.0.0.1:8000;
            proxy_redirect off;
            proxy_set_header Host $host:80;
            proxy_set_header X-Real-IP $remote_addr;
            proxy_set_header X-Forwarded-For $proxy_add_x_forwarded_for;
        }
启动nginx。以下部分通过配置supervisor启动即可。
使用gunicorn 参见gunicorn_cofig.py配置文件gunicorn mailServerStudy:app -p mailServerStudy.pid -c gunicorn_config.py
-D 参数可以后台运行,避免关闭控制台后进程退出
使用Celery+Flower http://www.celeryproject.org/
正确使用celery的7条建议
使用flower管理任务:http://localhost:5555/
使用RabbitMQ https://www.rabbitmq.com/
安装路径/usr/local/sbin,不会自动添加到环境变量中,需要自己设置一下。
sudo scutil --set HostName myhost.local
# 然后添加到/etc/hosts
127.0.0.1       localhost myhost myhost.local
常用命令,注意要给rabbitmq对应目录的写权限,否则运行时会提示错误
前台运行
rabbitmq-server
后台运行
brew services start rabbitmq
停止rabbitmq服务,这里特别说明不要使用kill来停止服务
rabbitmqctl stop
使用Supervisor Supervisor python2 环境。官方还没有出py3的版本,不过不影响管理py3的进程。
# 创建默认的配置文件,默认会到/etc/下面找,如果自定义了路径可以使用-c来指定路径
echo_supervisord_conf > /etc/supervisord.conf
# 要给写权限
sudo chmod -R 777 /var/log/supervisor
# 启动
supervisord -c ~/Documents/java_library/supervisor.conf
# 常用命令
# 停止某一个进程,program_name 为 [program:x] 里的 x
supervisorctl stop program_name
# 启动某个进程
supervisorctl start program_name
# 重启某个进程
supervisorctl restart program_name
# 结束所有属于名为 groupworker 这个分组的进程 (start,restart 同理)
supervisorctl stop groupworker:
# 结束 groupworker:name1 这个进程 (start,restart 同理)
supervisorctl stop groupworker:name1
# 停止全部进程,注:start、restart、stop 都不会载入最新的配置文件
supervisorctl stop all
# 载入最新的配置文件,停止原有进程并按新的配置启动、管理所有进程
supervisorctl reload
# 根据最新的配置文件,启动新配置或有改动的进程,配置没有改动的进程不会受影响而重启
supervisorctl update
配置文件说明:这里补充一下,视频里面忘了说这个文件了/etc/supervisord.conf
[unix_http_server]
file=/Users/zhengjun/Documents/java_library/supervisor/supervisor.sock   ; (the path to the socket file)

[supervisord]
logfile=/Users/zhengjun/Documents/java_library/supervisor//supervisord.log ; (main log file;default $CWD/supervisord.log)
...
pidfile=/Users/zhengjun/Documents/java_library/supervisor//supervisord.pid ; (supervisord pidfile;default supervisord.pid)
打开web管理支持:
[supervisorctl]
serverurl=unix:///Users/zhengjun/Documents/java_library/supervisor//supervisor.sock ; use a unix:// URL  for a unix socket
serverurl=http://127.0.0.1:9001 ; use an http:// url to specify an inet socket
...
这里引入程序的配置项,视频里面讲解的是这里引入的配置文件。
[include]
files = /Users/zhengjun/project/PycharmProjects/mailServerStudy/app/*.conf
开机自动启动 Supervisord,这一步没有实际操作过,这里就是记录一下http://www.restran.net/2015/10/04/supervisord-tutorial/
添加到/etc/rc.local 里面的脚本中,需要添加在 exit 命令前,使用绝对路径
# 如果是 Ubuntu 添加以下内容
/usr/local/bin/supervisord -c /etc/supervisord.conf
# 如果是 Centos 添加以下内容
/usr/bin/supervisord -c /etc/supervisord.conf
还有个方法就是使用网友提供的各种系统的运行supervisor的脚本https://github.com/Supervisor/initscripts
使用pycharm创建flask项目,指定flaskMailPy3环境。
添加发送邮件接口,直接看代码吧,东西不多。这里就不复制了。会在视频里面详细讲解
补充说明:后来浏览网页的时候看到了一些开源的邮件库,下面是一个,还没具体查看。
flask email service学习笔记-html+图片(补充) 上篇学习笔记的发送邮件中html正文中的图片是采用在html里面使用base64直接编码图片的方式发送的。
视频分享:youtube 优酷 GIT
html模板
<body>
	<header></header>

	<img height="120" width="343" style="text-align:center;margin-left:8%" src="cid:invoice" alt="增值税电子普通发票"/>
	<div>
		<p>尊敬的用户,您好:</p>
		<p><strong>您申请的电子发票已投递成功</strong>,请查收。<br>如您对发票信息有疑问请您联系商家或致电<span>400-xxx-xxxx
</span></p>
		<p>xx电子发票服务</p>
	</div>
</body>
代码修改
# add html content png
SITE_ROOT = os.path.realpath(os.path.dirname(__file__))
imgPath = os.path.join(SITE_ROOT, "templates", "invoice.png")

with open(imgPath, 'rb') as fp:
 msg.attach(filename=imgPath, data=fp.read(),
            content_type='application/octet-stream', disposition='inline',
            headers=[('Content-ID', 'invoice')])