official site
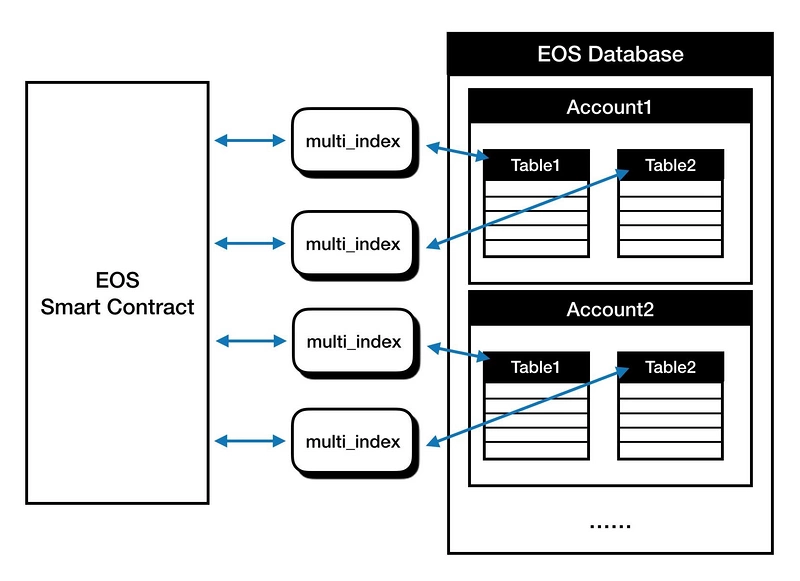
Multi Index Tables are a way to cache state and/or data in RAM for fast access. Multi index tables support create, read, update and delete (CRUD) operations,
each smart contract using a multi index table reserves a partition of the RAM cache; access to each partition is controlled using tablename, code and scope.
Multi Index Tables provide a fast to access data store and are a practical way to store data for use in your smart contract. The blockchain records the transactions, but you should use Multi Index Tables to store application data.
template <uint64_t TableName, typename T, typename ... Indices>class multi_index { ... }
第一个参数是表名,第二个参数是表对象的类型,其余为可变参数Indices(二级索引),二级索引的数量不能超过16个。
EOS的multi_index类似boost的multi_index,即多索引容器。有了多级索引,智能合约就具备了操作类似数据库模块的功能。
每一个 multi_index 容器都可以理解成一个对象列表,通常这个对象是struct或者是class类型的,有多个成员变量
// @abi table proposal i64
struct Proposal {
  uint64_t id;
  account_name owner = 0;
  string description;
  std::vector<account_name, uint32_t> votes;

  uint64_t primary_key() const { return id; }

  EOSLIB_SERIALIZE( Proposal, (id)(owner)(description)(votes))
};


typedef eosio::multi_index<N(Proposal), Proposal> proposals;
在部署合约之前,我们都会用eosiocpp来生成ABI,EOS智能合约编译器可以读取struct结构体和public方法之前的注。在注释中我们可以传入两种类型:action和table,ABI就会根据我们的声明,自动在生成的ABI中添加相应的方法或者表定义。
第二个proposal就是表名,而第三个i64就是表的主键的类型。在这里主键就是id。
multi_index相关操作 创建:使用.emplace
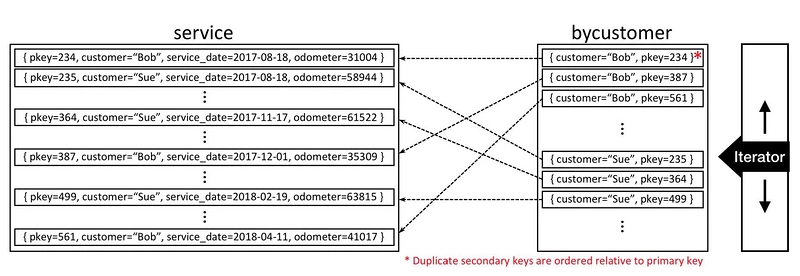
自定义索引 struct service_struct { uint64_t pkey; account_name customer; Date date; uint32_t odometer; auto primary_key() const {return pkey;} account_name get_customer() const {return customer;} EOSLIB_SERIALIZE(service_struct,( pkey )( customer )( date )( odometer )) } typedef eosio::multi_index<service, service_struct, index_by<N(bycustomer), const_mem_fun<service_struct,account_name, &service_struct::get_customer> > > customer_index;
解释一下,使用上面的方式来定义索引,eosio::multi_index<…>的参数解释如下:
service : multi_index容器的表名(如上图)
N(bycustomer) : 给索引起个名字 - bycustomer
account_name : 索引的类型
这里定义了customer_index类型,这样以后就可以直接用这个类型去初始化真正的multi_index表。
下面内容参考至
add data void app::create(const account_name account, const string& username, uint32_t age, const string& bio) { require_auth(account); profile_table profiles(_self, _self); auto itr = profiles.find(account); eosio_assert(itr == profiles.end(), "Account already exists"); profiles.emplace(account, [&](auto& p) { p.account = account; p.username = username; p.age = age; p.bio = bio; }); }
profile_table是一种类型,可以理解成表示multi_index表,后面的profiles(_self, _self)才是真正构建一个multi_index表的实例。profiles里的两个参数依次就是我们前面提到过的code和scope,分别表示表的拥有账户以及代码层次结构的范围标识符
根据主键获取相关信息 void app::get(const account_name account) { profile_table profiles(_self, _self); auto itr = profiles.find(account); eosio_assert(itr != profiles.end(), "Account does not exist"); print("Account: ", name{itr->account}, " , "); print("Username: ", itr->username.c_str(), " , "); print("Age: ", itr->age , " , "); print("Bio: ", itr->bio.c_str()); }
先把multi_index表实例化,之后要求查询的结果不能为空 (即itr != profiles.end()),如果不为空的话,就返回主键对应的其他字段的信息。
根据主键更新信息 void app::update(const account_name account, const string& username, uint32_t age, const string& bio) { require_auth(account); profile_table profiles(_self, _self); auto itr = profiles.find(account); eosio_assert(itr != profiles.end(), "Account does not exist"); profiles.modify(itr, account, [&](auto& p) { p.username = username; p.age = age; p.bio = bio; }); }
确保主键不为空的情况下,更新该主键对应的其他字段的信息。
根据主键删除数据 void app::remove(const account_name account) { require_auth(account); profile_table profiles(_self, _self); auto itr = profiles.find(account); eosio_assert(itr != profiles.end(), "Account does not exist"); profiles.erase(itr); print(name{account} , " deleted!"); }
通过自定义的自定义索引实现查询 自定义索引by_age(),即以年龄为条件进行筛选
void app::byage(uint32_t age) {
    print("Checking age: ", age, "\n");
    profile_table profiles(_self, _self);

    // get an interface to the 'profiles' containter
    // that looks up a profile by its age
    auto age_index = profiles.get_index<N(age)>();

    auto itr = age_index.lower_bound(age);

    for(; itr != age_index.end() && itr->age == age; ++itr) {
        print(itr->username.c_str(), " is ", itr->age, " years old\n");
    }
}
这里我们使用了在头文件里定义过的名为age的index,重新得到了一张以age排序的multi_index。
这里的lower_bound是EOS封装的API,返回age_index中,当前索引≥age的迭代器;之后遍历该迭代器,就可以获得所有age≥某个特定值的所有数据。
和lower_bound相对应的,就是upper_bound方法,用法和lower_bound类似。如下就实现了同时指定age上下限的查询:
void app::agerange(uint32_t young, uint32_t old) {
    profile_table profiles(_self, _self);

    auto age_index = profiles.get_index<N(age)>();

    auto begin = age_index.lower_bound(young);
    auto end   = age_index.upper_bound(old);

    for_each(begin, end, [&](auto& p) {
        print(p.username.c_str(), " is ", p.age, " years old\n");
    });
}