Python looks for modules in “sys.path”

import sys
type(sys.path)
for path in sys.path:
print(path)

# 可以手动加入搜索路径,这个是相对于 Python 的路径,
sys.path.append('code')

zip 文件

任何文件都可以存在于 ZIP档案之中,但是只有 .py 和 .pyc 文件是能够导入的。不允许导入 ZIP 中的动态模组( .pyd , .so )。请注意,如果档案中只包含 .py 文件, Python不会尝试通过添加对应的 .pyc 文件修改档案,意思是如果 ZIP 档案不包含 .pyc 文件,导入或许会变慢。

ref.

.pyc File Type

被引用时自动生成,加快启动速度。
源文件改动时会自动更新

.pyo

the .pyo file results from running the interpreter when optimization settings are enabled.

The optimizer is enabled by adding the “-O” flag when we invoke the Python interpreter.

python -O using_lambdas.py

源文件改动时会自动更新

.pyd

In the Windows ecosystem, a .pyd file is a library file containing Python code which can be called out to and used by other Python applications. In order to make this library available to other Python programs, it is packaged as a dynamic link library.

A .pyd file is a dynamic link library that contains a Python module, or set of modules, to be called by other Python code.

LPVOID lpBase;
HANDLE hMapFile;

int load_mmp_file(const wstring& filePath)
{
scope_filePtr file(filePath, L"rb");
uint32_t size = file.fileSize();
unique_ptr<char[]> spBuf = make_unique<char[]>(size + 1);
file.read(spBuf.get(), size, 1, size);
file.close();

// Create a memory-mapped file (MMF)
// 创建共享文件句柄
hMapFile = CreateFileMapping(
INVALID_HANDLE_VALUE, // 物理文件句柄
NULL, // 默认安全级别
PAGE_READWRITE, // 可读可写
0, // 高位文件大小
size, // 地位文件大小
L"ShareMemory" // 共享内存名称
);
// 映射缓存区视图 , 得到指向共享内存的指针
lpBase = MapViewOfFile(
hMapFile, // 共享内存的句柄
FILE_MAP_ALL_ACCESS, // 可读写许可
0,
0,
size
);

// 将数据拷贝到共享内存
memcpy((char*)lpBase, spBuf.get(), size);

return size;
}

// 解除文件映射
UnmapViewOfFile(lpBase);
// 关闭内存映射文件对象句柄
CloseHandle(hMapFile);
// 打开共享的文件对象
HANDLE hMapFile = OpenFileMapping(FILE_MAP_ALL_ACCESS,NULL,L"ShareMemory");
if (hMapFile)
{
LPVOID lpBase = MapViewOfFile(hMapFile,FILE_MAP_ALL_ACCESS,0,0,0);
// 将共享内存数据拷贝出来
char szBuffer[BUF_SIZE] = {0};
strcpy(szBuffer,(char*)lpBase);
printf("%s",szBuffer);

// 解除文件映射
UnmapViewOfFile(lpBase);
// 关闭内存映射文件对象句柄
CloseHandle(hMapFile);
}
else
{
// 打开共享内存句柄失败
printf("OpenMapping Error");
}

doc

This support allows creation of memory segments that can be shared between Python processes and, consequently, help avoid (de)serialization costs when sharing data between processes.

shm = shared_memory.SharedMemory(create=False, size=a.nbytes,name='ShareMemory')

print(type(shm.buf))
<class 'memoryview'>

datas =shm.buf.tobytes()
print(type(datas))
<class 'bytes'>

Things to Remember

  • The memoryview built-in type provides a zero-copy interface for reading and writing slices of objects that support Python’s high performance buffer protocol.
  • The bytearray built-in type provides a mutable bytes-like type that can be used for zero-copy data reads with functions like socket.recv_from.
  • A memoryview can wrap a bytearray, allowing for received data to be spliced into an arbitrary buffer location without copying costs.

每天一个日志文件

def init_log(self):
self.log = logging.getLogger('tkArc')
self.log.setLevel(logging.DEBUG)
# Add the log message handler to the logger
handler = logging.handlers.TimedRotatingFileHandler('./tkArc.log', when='midnight')
logdf = logging.Formatter('$asctime $name ${levelname} $message', style='$')
handler.setFormatter(logdf)
self.log.addHandler(handler)

循环记录日志

import logging
import logging.handlers

my_logger = logging.getLogger('fireworks_plugin')
my_logger.setLevel(logging.DEBUG)
# Add the log message handler to the logger
handler = logging.handlers.RotatingFileHandler(
'fireworks_plugin.log', maxBytes=1024*1000*10, backupCount=5)
df = logging.Formatter('$asctime $name ${levelname} $message', style='$')
handler.setFormatter(df)
my_logger.addHandler(handler)

for i in range(100):
my_logger.warning('This is a warning')
my_logger.debug('This is a debuging')
my_logger.info('This is a info')
my_logger.error('This is a error')

用来提供股票相关操作和信息
已经安装 anaconda

创建虚拟环境

conda create --name flask_stocks python=3.8 flask

使用 pycharm 创建项目,运行起来可以看到 hello world

构建程序结构

  1. 新建一个python package - “src”,用来放我们的程序,下面的操作都在src下面
  2. 把static和templates移到src下面
  3. 新建一个python package - “site”,用来放网页处理部分
  4. 新建一个python package - “api”,用来放api接口
  5. 新建一个python package - “admin”,用来放后台管理部分
  6. static下面建立目录-css/images/js,css和js下面建立目录ext用来放第三方的库
  7. 把static目录复制到src/admin, src/site下面
  8. 新建一个python package - “models”,用来放数据模型
  9. 在src,src/admin,src/site下面新建目录 - “templates”

src/templates用来放公共模板。各自蓝图下面的templates放各自的模板,
src/static也是用来放公共资源的,各自蓝图下面的static放各自使用的静态资源。

目录结构如下:

20200603_211854.png

建立配置文件

# config.py
# coding:utf-8
import os
from datetime import timedelta

basedir = os.path.abspath(os.path.dirname(__file__))


class Config:
DEBUG = False
TESTING = False
# 登录设置 session cookie使用
SECRET_KEY = os.environ.get('SECRET_KEY') or 'AllthingsWORKtogherFORGoOd'
UPLOAD_FOLDER = 'static/upload'
# database config
# mysql+pymysql://name:password@localhost/db_name
SQLALCHEMY_DATABASE_URI = os.environ.get(
'DEV_DATABASE_URL') or 'mysql+pymysql://root:mysql@localhost:3306/books'
SQLALCHEMY_COMMIT_ON_TEARDOWN = True
SQLALCHEMY_TRACK_MODIFICATIONS = False
FLASKY_ADMIN = os.environ.get('FLASKY_ADMIN')

@staticmethod
def init_app(app):
pass


class DevelopmentConfig(Config):
DEBUG = True
send_file_max_age_default = timedelta(seconds=1)
use_reloader = True
TEMPLATES_AUTO_RELOAD = True
SQLALCHEMY_DATABASE_URI = os.environ.get(
'DEV_DATABASE_URL') or 'mysql+pymysql://root:mysql@localhost:3306/books'

class TestingConfig(Config):
TESTING = True


class ProductionConfig(Config):
SQLALCHEMY_DATABASE_URI = os.environ.get(
'DEV_DATABASE_URL') or 'mysql+pymysql://root:mysql@localhost:3306/books'


config = {
'development': DevelopmentConfig,
'testing': TestingConfig,
'production': ProductionConfig,

'default': DevelopmentConfig
}

建立应用

在 src/admin,src/site,下面建立 routes_site.py 做网站路由处理,routes_api.py 做各自的 api 服务
src/api 下面建立 routes_api.py 做公共 api 服务

增加蓝图路由

# src/admin/__init__.py
# coding:utf-8
from flask import Blueprint

admin = Blueprint('admin', __name__, template_folder='templates',static_folder='static',
static_url_path='/admin/static')

from . import routes_site, routes_api

# src/api/__init__.py
# coding:utf-8
from flask import Blueprint

api = Blueprint('api', __name__)

# src/site/__init__.py
# coding:utf-8
from flask import Blueprint

site = Blueprint('site', __name__, template_folder='templates', static_folder='static', static_url_path='/site/static')
site_api = Blueprint('site_api', __name__, template_folder='templates', static_folder='static',
static_url_path='/site/static')

# 末尾导入是为了避免循环导入依赖
from . import routes_site, routes_api
# src/__init__.py

# 使用工厂函数创建实例
from flask import Flask

from config import config


def create_app(config_name):
app = Flask(__name__)
app.config.from_object(config[config_name])
config[config_name].init_app(app)


# 路由和自定义错误页面
from src.site import site
from src.api import api as api_blueprint
from src.admin import admin as admin_blueprint

# 访问时需要加上前缀
app.register_blueprint(site)
app.register_blueprint(api_blueprint, url_prefix='/api/v1.0')
app.register_blueprint(admin_blueprint, url_prefix='/admin')

return app

修改 app.py

# app.py

# coding:utf-8
import os

from src import create_app

app = create_app(os.getenv('FLASK_CONFIG') or 'default')

if __name__ == '__main__':
app.run(host='0.0.0.0', port=5000, debug=True)

添加 404 和 500 出错页面

# src/templates/404.html
# src/templates/500.html

填写测试路由,注意这里需要访问 http://127.0.0.1:5000/site ,因为蓝图里面添加了前缀

# src/site/routes_site.py

from flask import render_template, app

from src.site import site


@site.route('/', methods=['GET'])
def index():
return 'Hello world site'


@site.app_errorhandler(404)
def page_not_found(e):
return render_template('404.html'), 404


@site.app_errorhandler(500)
def internal_server_error(e):
import traceback
traceback.print_exc()
errMsg = traceback.format_exc()
app.logger.exception('error 500: %s', errMsg)
return render_template('500.html'), 500

打开调试选项

20200603_220459.png

Matrix 用来表示数学意义上的矩阵和向量,Array 用来表示 1D 和 2D 的数组

但在 Eigen 中 matrix 与 array 是有明确区别的,总的来说,Eigen 中的 matrix 与线性代数息息相关,它设计的初衷就是为了解决线性代数问题,例如解线性方程组、求矩阵特征值、矩阵的秩、QR分解等等。而 array 则负责系数运算,例如所有系数加上一个常数或者两个 array 系数相乘。

Eigen::MatrixXf

float
Eigen::MatrixXf

double
Eigen::MatrixXd

int n = 12;
std::vector Avec(n * n);
Eigen::MapEigen::MatrixXd A(Avec.data(), n, n);

testNistMGH17

c++ 版本的 polyfit 和 numpy 同样的算法 Levenberg-Marquardt Optimization

折腾了 2 天,找到了一个讲的比较细致的文章,总算把问题解决了。

下面是参考原文:

ref. part1
ref. part2

The Levenberg-Marquardt curve-fitting method is actually a combination of two minimization methods: the gradient descent method and the Gauss-Newton method.

fit 是拟合后的数据,measured 是原始数据
20200603_102846.png

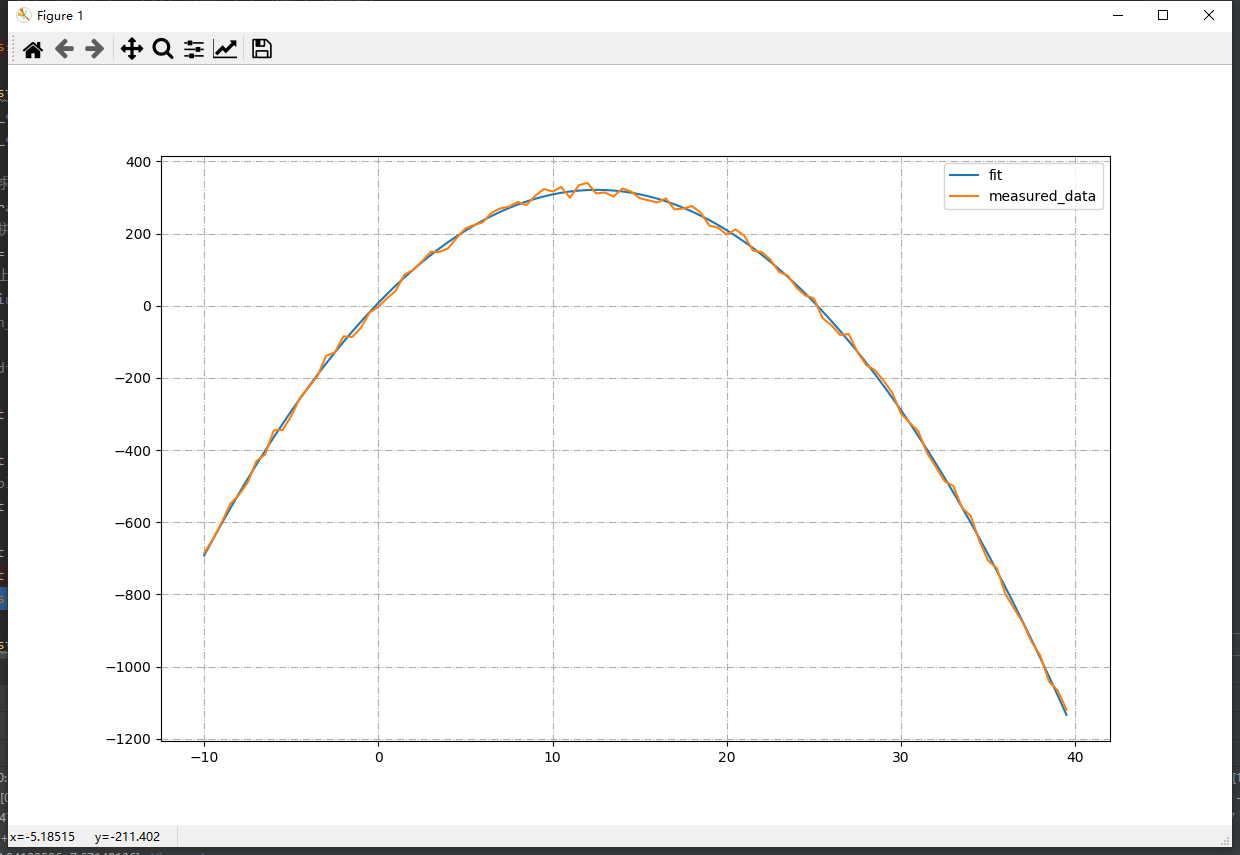
Eigen’s non-linear optimization module

速度巨慢

//
// PolyfitEigen.hpp
// Polyfit
//
// Created by Patrick Löber on 23.11.18.
// Copyright © 2018 Patrick Loeber. All rights reserved.
//
// Use the Eigen library for fitting: http://eigen.tuxfamily.org
// See https://eigen.tuxfamily.org/dox/group__TutorialLinearAlgebra.html for different methods

#include <Eigen/Dense>

template<typename T>
std::vector<T> polyfit_Eigen(const std::vector<T> &xValues, const std::vector<T> &yValues, const int degree, const std::vector<T>& weights = std::vector<T>(), bool useJacobi = true)
{
using namespace Eigen;

bool useWeights = weights.size() > 0 && weights.size() == xValues.size();

int numCoefficients = degree + 1;
size_t nCount = xValues.size();

MatrixXf X(nCount, numCoefficients);
MatrixXf Y(nCount, 1);

// fill Y matrix
for (size_t i = 0; i < nCount; i++)
{
if (useWeights)
Y(i, 0) = yValues[i] * weights[i];
else
Y(i, 0) = yValues[i];
}

// fill X matrix (Vandermonde matrix)
for (size_t nRow = 0; nRow < nCount; nRow++)
{
T nVal = 1.0f;
for (int nCol = 0; nCol < numCoefficients; nCol++)
{
if (useWeights)
X(nRow, nCol) = nVal * weights[nRow];
else
X(nRow, nCol) = nVal;
nVal *= xValues[nRow];
}
}

VectorXf coefficients;
//雅可比方法(Jacobian method)
if (useJacobi)
coefficients = X.jacobiSvd(ComputeThinU | ComputeThinV).solve(Y);
else
coefficients = X.colPivHouseholderQr().solve(Y);

return std::vector<T>(coefficients.data(), coefficients.data() + numCoefficients);
}


/*
Calculates the value of a polynomial of degree n evaluated at x. The input
argument coefficients is a vector of length n+1 whose elements are the coefficients
in incremental powers of the polynomial to be evaluated.

param:
coefficients polynomial coefficients generated by polyfit() function
xValues x axis values

return:
Fitted Y values.
*/
template<typename T>
std::vector<T> polyval(const std::vector<T>& coefficients, const std::vector<T>& xValues)
{
size_t nCount = xValues.size();
size_t nDegree = coefficients.size();
std::vector<T> yValues(nCount);

for (size_t i = 0; i < nCount; i++)
{
T yVal = 0;
T xPowered = 1;
T xVal = xValues[i];
for (size_t j = 0; j < nDegree - 1; j++)
{
yVal += coefficients[j] * pow(xVal, nDegree - 1 - j);
}
yValues[i] = yVal + coefficients[nDegree-1];
}

return yValues;
}

编译

dlib

使用 cmake 生成 vs2019 项目

注意一下配置项符合自己的需求就可以了。

打开项目后,可以顺利的生成 debug 和 release 版本。

使用

使用时需要修改一个 dlib/config.h 文件,否则会提示 USER_ERROR__inconsistent_build_configuration__see_dlib_faq_2?

在 cmake 生成的 build 目录下面,也会有个 config.h 文件,参考里面的内容,根据自己的需要修改一下 dlib/config.h 文件

// If you are compiling dlib as a shared library and installing it somewhere on your system
// then it is important that any programs that use dlib agree on the state of the
// DLIB_ASSERT statements (i.e. they are either always on or always off). Therefore,
// uncomment one of the following lines to force all DLIB_ASSERTs to either always on or
// always off. If you don't define one of these two macros then DLIB_ASSERT will toggle
// automatically depending on the state of certain other macros, which is not what you want
// when creating a shared library.
//#define ENABLE_ASSERTS // asserts always enabled
#define DLIB_DISABLE_ASSERTS // asserts always disabled

//#define DLIB_ISO_CPP_ONLY
#define DLIB_NO_GUI_SUPPORT
//#define DLIB_ENABLE_STACK_TRACE

// You should also consider telling dlib to link against libjpeg, libpng, libgif, fftw, CUDA,
// and a BLAS and LAPACK library. To do this you need to uncomment the following #defines.
// #define DLIB_JPEG_SUPPORT
// #define DLIB_PNG_SUPPORT
// #define DLIB_GIF_SUPPORT
// #define DLIB_USE_FFTW
// #define DLIB_USE_BLAS
// #define DLIB_USE_LAPACK
// #define DLIB_USE_CUDA


// Define this so the code in dlib/test_for_odr_violations.h can detect ODR violations
// related to users doing bad things with config.h
//#define DLIB_NOT_CONFIGURED
#define DLIB_CHECK_FOR_VERSION_MISMATCH DLIB_VERSION_MISMATCH_CHECK__EXPECTED_VERSION_19_19_0

使用 最小二乘法 做曲线拟合

#include <dlib/optimization.h>

#ifdef _DEBUG
#ifdef _WIN64
#pragma comment(lib,"dlib19.19.0_debug_64bit_msvc1925.lib")
#else
#pragma comment(lib,"xx.lib")
#endif
#else
#ifdef _WIN64
#pragma comment(lib,"dlib19.19.0_minsizerel_64bit_msvc1925.lib")
#else
#pragma comment(lib,"xx.lib")
#endif
#endif