spring-boot-starter-data-mongodb

// https://mvnrepository.com/artifact/org.springframework.boot/spring-boot-starter-data-mongodb
compile group: 'org.springframework.boot', name: 'spring-boot-starter-data-mongodb', version: '2.1.2.RELEASE'

启动 mongodb

// 运行
mongod --dbpath ~zhengjun/project/mongodb/webStudy --bind_ip 127.0.0.1

JUnit 5
java1.8
spring boot2

spring-boot-starter-test
h2database:
The H2 DB is our in-memory database. It eliminates the need for configuring and starting an actual database for test purposes.

// https://mvnrepository.com/artifact/org.springframework.boot/spring-boot-starter-test
testCompile group: 'org.springframework.boot', name: 'spring-boot-starter-test', version: '2.1.2.RELEASE'
// https://mvnrepository.com/artifact/com.h2database/h2
testCompile group: 'com.h2database', name: 'h2', version: '1.4.197'

junit5 config

testImplementation 'org.junit.jupiter:junit-jupiter-api:5.3.2'
testRuntimeOnly 'org.junit.jupiter:junit-jupiter-engine:5.3.2'

如果引用的包是 jupiter 说明是使用的 junit5 了

import org.junit.jupiter.api.AfterEach;
import org.junit.jupiter.api.BeforeEach;
import org.junit.jupiter.api.DisplayName;
import org.junit.jupiter.api.Test;

在测试类上面标注,指定测试的控制器包

@WebMvcTest(controllerUser.class)
class controllerUserTest {...}

Junit常用注解:
@Before:初始化方法
@After:释放资源
@Test:测试方法,在这里可以测试期望异常和超时时间
@Ignore:忽略的测试方法
@BeforeClass:针对所有测试,只执行一次,且必须为static void
@AfterClass:针对所有测试,只执行一次,且必须为static void
@RunWith:指定使用的单元测试执行类

verify(mock, times(5)).someMethod("was called five times");
verify(mock, never()).someMethod("was never called");
verify(mock, atLeastOnce()).someMethod("was called at least once");
verify(mock, atLeast(2)).someMethod("was called at least twice");
verify(mock, atMost(3)).someMethod("was called at most 3 times");
verify(mock, atLeast(0)).someMethod("was called any number of times"); // useful with captors
verify(mock, only()).someMethod("no other method has been called on the mock");

Github

  1. 先要安装 node.js
  2. cnpm 代替 npm 这个主要是因为国外服务不好访问的原因
  3. yarn 代替 npm
    使用 yarn 代替 npm,提高效率
    npm install -g yarn
    npm upgrade yarn

你应该按照以下的顺序进行学习, 而不是跳着学或者同时学习:

React
npm
JavaScript “打包工具”
ES6
Routing
Flux
https://github.com/petehunt/react-howto/blob/master/README-zh.md

Yarn和npm命令对比

npm install === yarn
npm install taco --save === yarn add taco
npm uninstall taco --save === yarn remove taco
npm install taco --save-dev === yarn add taco --dev
npm update --save === yarn upgrade

https://www.bootcdn.cn/

//安装指定版本,避免兼容性问题
sudo npm i -g create-react-app@1.5.2

// install vscode plugin
`Simple React Snippets` by Burke Holland
`Prettier - Code formatter` by Esben Petersen
set this `editor.formatOnSave = true`

//会安装所有依赖
npx create-react-app react-app

cd react-app
npm start // 会自动打开浏览器


yarn build

cd my-app
cd src
rm -f *
cd ..

组件间传数据
检查传入参数类型
prop-types

无状态组件:没有生命周期,输入固定,输出也固定

高阶组件 HOC

父组件传值给子组件比较简单,直接属性的方式即可
子组件传值给父组件,需要回调函数
兄弟组件传值,是通过父组件中转实现的

https://react-bootstrap.github.io/

图片库
https://www.pexels.com/

处理图片
https://croppola.com/

处理文字
https://www.bobrosslipsum.com/

create-react-app react-bootstrap

yarn add react-bootstrap bootstrap react-router-dom
yarn start

//添加 bootstrap css
<link
rel="stylesheet"
href="https://maxcdn.bootstrapcdn.com/bootstrap/4.2.1/css/bootstrap.min.css"
integrity="sha384-GJzZqFGwb1QTTN6wy59ffF1BuGJpLSa9DkKMp0DgiMDm4iYMj70gZWKYbI706tWS"
crossorigin="anonymous"
/>

yarn start
Starts the development server.

yarn build
Bundles the app into static files for production.

yarn test
Starts the test runner.

yarn eject
Removes this tool and copies build dependencies, configuration files
and scripts into the app directory. If you do this, you can’t go back!

We suggest that you begin by typing:

cd react-bootstrap
yarn start

springfox-demos
OpenAPI-Specification

注意,如果不指定请求的 Method 会把所有支持的 Method 都自动显示出来,GET,POST,HEAD,DELETE…等等

添加插件配置

添加插件, 在这里获取 https://mvnrepository.com/

// https://mvnrepository.com/artifact/io.springfox/springfox-swagger2
compile group: 'io.springfox', name: 'springfox-swagger2', version: '2.9.2'
// https://mvnrepository.com/artifact/io.springfox/springfox-swagger-ui
compile group: 'io.springfox', name: 'springfox-swagger-ui', version: '2.9.2'

Swagger2 配置

在主应用同级目录下创建 swagger2Config.java 内容如下,根据实际情况修改

package com.example.demo;

import com.google.common.base.Predicate;
import com.google.common.base.Predicates;
import org.springframework.context.annotation.Bean;
import org.springframework.context.annotation.Configuration;
import springfox.documentation.builders.ApiInfoBuilder;
import springfox.documentation.builders.PathSelectors;
import springfox.documentation.builders.RequestHandlerSelectors;
import springfox.documentation.service.ApiInfo;
import springfox.documentation.spi.DocumentationType;
import springfox.documentation.spring.web.plugins.Docket;
import springfox.documentation.swagger2.annotations.EnableSwagger2;


@Configuration
@EnableSwagger2
public class swagger2Config {
@Bean
public Docket createRestApi() {
return new Docket(DocumentationType.SWAGGER_2)
.groupName("public-api")
.apiInfo(apiInfo())
.select()
.apis(RequestHandlerSelectors.basePackage("com.example.demo"))
.paths(paths())
.build();
}

private ApiInfo apiInfo() {
return new ApiInfoBuilder()
.title("REST API 文档演示")
.description("Gradle 构建 Spring boot项目 集成 mybatis 使用 pagehelper 插件")
.termsOfServiceUrl("http://zhengjunblog.top")
.version("1.0")
.build();
}

//Here is an example where we select any api that matches one of these paths
private Predicate<String> paths() {
return Predicates.or(
PathSelectors.regex("/api/.*"),
PathSelectors.regex("/business/.*"));
}

}

apis() 定义包含的类(controller and model classes)。这个是包括所有的 RequestHandlerSelectors.any(),可通过包名,类名来定制
paths() 通过路径映射来定制。

实体类的注释

package com.example.demo;

import io.swagger.annotations.ApiModel;
import io.swagger.annotations.ApiModelProperty;

@ApiModel(value="Topic 对象",description="Topic 对象类的相关描述")
public class Topic {

@ApiModelProperty(value="Topic id",name="id",example="1",required=true)
private String id;
@ApiModelProperty(value="Topic string",name="topic",example="java",required=true)
private String topic;
@ApiModelProperty(value="Topic description",name="descript",example="a java description",required=true)
private String descript;
...
}
@Configuration 注解 让Spring来加载该类配置
@EnableSwagger2 注解 启用Swagger2。

.apis(RequestHandlerSelectors.basePackage("com.example.demo.Controller"))
待扫描的接口包,Swagger会扫描该包下所有Controller定义的API ,并生成API文档(除了被@ApiIgnore指定的请求)。

@ApiImplicitParams、@ApiImplicitParam 注解来给参数增加说明
@Api:用在类上,说明该类的作用
@ApiOperation(value = “接口说明”, httpMethod = “接口请求方式”, response = “接口返回参数类型”, notes = “接口发布说明”;其他参数可参考源码;
@ApiImplicitParams:用在方法上包含一组参数说明
@ApiImplicitParam:用在@ApiImplicitParams注解中,指定一个请求参数的各个方面
paramType:参数放在哪个地方
header-->请求参数的获取:@RequestHeader
query-->请求参数的获取:@RequestParam
path(用于restful接口)-->请求参数的获取:@PathVariable
body(不常用)
form(不常用)
name:参数名
dataType:参数类型
required:参数是否必须传
value:参数的意思
defaultValue:参数的默认值
@ApiResponses:用于表示一组响应
@ApiResponse:用在@ApiResponses中,一般用于表达一个错误的响应信息
code:数字,例如400
message:信息,例如"请求参数没填好"
response:抛出异常的类
@ApiModel:描述一个Model的信息(这种一般用在post创建的时候,使用@RequestBody这样的场景,请求参数无法使用@ApiImplicitParam注解进行描述的时候)
@ApiModelProperty()用于方法,字段; 表示对model属性的说明或者数据操作更改
value–字段说明
name–重写属性名字
dataType–重写属性类型
required–是否必填
example–举例说明
hidden–隐藏

Install OpenJDK 8 JDK

sudo yum install java-1.8.0-openjdk-devel

Java 1.8,IDEA 2018.1
gradle

Spring Boot 2.2 增加了对Java 13的支持 对于老版本的Java 11、Java 8依然支持良好。所以,对于还在使用Java 8的用户也可以安心的升级使用。

http://start.spring.io

配置 VPN 代理

  • 配置 VPN
    我这里使用的是 shadowsocks。socks5 配置为 127.0.0.1:1086

  • 配置 IDEA
    Appearance & Behavior > System Settings > Http Proxy

    2083268e.png 
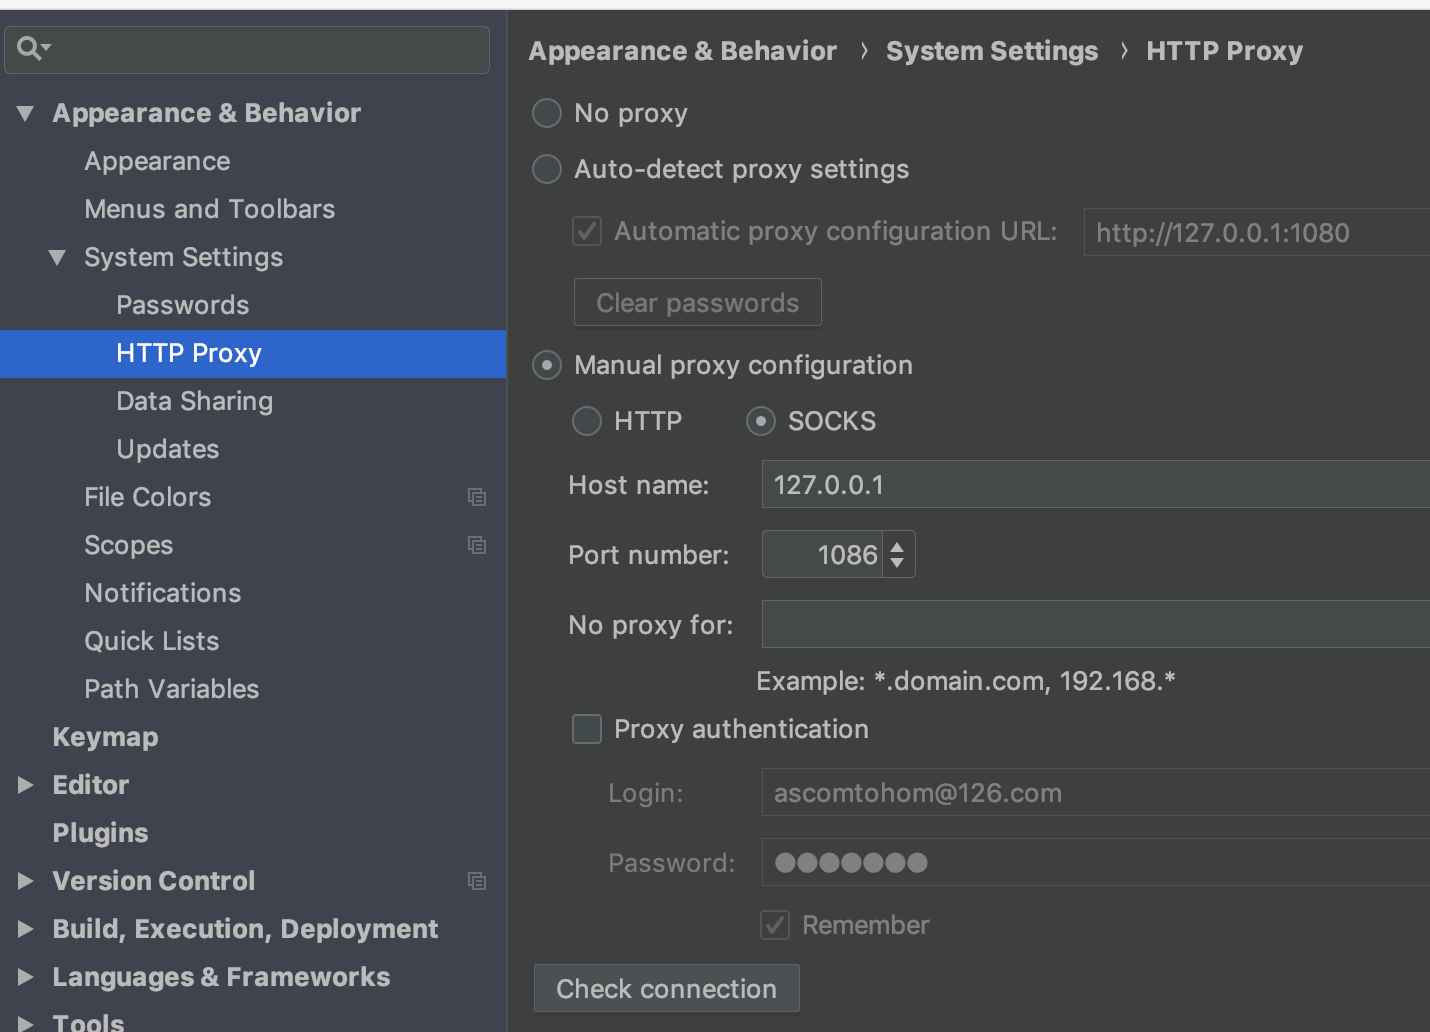
使用下面的 check connection 输入网址 `www.google.com` 可以正常访问就可以了。

新建项目

File-New-Project-Spring Initializr 选择 Gradle 工程,JAR 包,JAVA 11
依赖选择 Web, thymeleaf,mongodb

如果之前装了 java 8, 需要修改一下配置,settings/build,execution,deployment/Gradle/ 修改 JVM 版本

创建基本目录结构:common,controller,model,repository,service
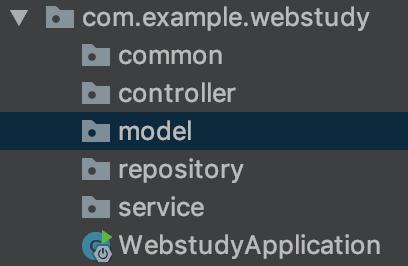
44a1b1fc.png

引入 bootstrap 4.3.1

<link rel="stylesheet" href="https://stackpath.bootstrapcdn.com/bootstrap/4.4.1/css/bootstrap.min.css" integrity="sha384-Vkoo8x4CGsO3+Hhxv8T/Q5PaXtkKtu6ug5TOeNV6gBiFeWPGFN9MuhOf23Q9Ifjh" crossorigin="anonymous">

<script src="https://code.jquery.com/jquery-3.4.1.slim.min.js" integrity="sha384-J6qa4849blE2+poT4WnyKhv5vZF5SrPo0iEjwBvKU7imGFAV0wwj1yYfoRSJoZ+n" crossorigin="anonymous"></script>
<script src="https://cdn.jsdelivr.net/npm/popper.js@1.16.0/dist/umd/popper.min.js" integrity="sha384-Q6E9RHvbIyZFJoft+2mJbHaEWldlvI9IOYy5n3zV9zzTtmI3UksdQRVvoxMfooAo" crossorigin="anonymous"></script>
<script src="https://stackpath.bootstrapcdn.com/bootstrap/4.4.1/js/bootstrap.min.js" integrity="sha384-wfSDF2E50Y2D1uUdj0O3uMBJnjuUD4Ih7YwaYd1iqfktj0Uod8GCExl3Og8ifwB6" crossorigin="anonymous"></script>

静态资源的引用

using webjars

在 resources/templates 下面创建 index.html

https://www.webjars.org/

使用 webjars 引用公共静态资源

http://localhost:8080/webjars/jquery/3.4.1/jquery.js

using resources

默认的静态资源存放路径 resources/static

使用 thymeleaf

  1. 导入名称空间
<html lang="en" xmlns:th="http://www.thymeleaf.org">
  1. 使用 th:xxx 语法替换原生属性值

使用 font awsome 5

在 css 里面配置时,出现小方块,不显示图标问题,在 html 里面配置时,正常

```

## 添加日志

spring boot 默认是 info
可以在 application.properties 里面添加

```yaml
# com.example.demo 是项目包,日志可以指定包设置
logging.level.com.example.demo=trace
# 当前项目路径下生成
logging.file.name=demo.log
# / 表示当前磁盘根路径
#logging.file.path=/demo/log/demo.log
Logger logger = LoggerFactory.getLogger(getClass());

logger.trace("log trace");
logger.debug("log debug");
logger.info("log info");
logger.warn("log warn");
logger.error("log error");

增加配置类,扩展 mvc 配置

@Configuration
public class extMvcConfig implements WebMvcConfigurer {

@Override
public void addViewControllers(ViewControllerRegistry registry) {
registry.addViewController("/main").setViewName("dashboard");
}
}

使用拦截器检查登陆权限


public class extLoginInterceptor implements HandlerInterceptor {

@Override
public boolean preHandle(HttpServletRequest request, HttpServletResponse response, Object handler) throws Exception {
Object user = request.getSession().getAttribute("loginUser");
if (user == null){
request.setAttribute("msg","没有权限,请登录.");
request.getRequestDispatcher("/index.html").forward(request,response);
return false;
}else {
return true;
}
}
}


@Configuration
public class extMvcConfig implements WebMvcConfigurer {

@Override
public void addViewControllers(ViewControllerRegistry registry) {
registry.addViewController("/dashboard.html").setViewName("dashboard");
registry.addViewController("/").setViewName("index");
registry.addViewController("/index.html").setViewName("index");
}

@Override
public void addInterceptors(InterceptorRegistry registry) {
registry.addInterceptor(new extLoginInterceptor()).addPathPatterns("/**").excludePathPatterns("/index.html","/","/index","/static/**");
}
}

设置多个环境配置

# 默认使用 application.properties
可以创建 application-{profile}.properties
例如:
application-develop.properties

然后在 application.properties 里面配置
spring.profiles.active=develop
// 使用 yaml
有个文档块模式可以分开写不同的配置

使用 --- 区分配置块
---

激活配置文件

java -jar xxx.jar --spring.profiles.active=develop

集成 Swagger2

添加插件, 在这里获取 https://mvnrepository.com/

// https://mvnrepository.com/artifact/io.springfox/springfox-swagger2
compile group: 'io.springfox', name: 'springfox-swagger2', version: '2.9.2'
// https://mvnrepository.com/artifact/io.springfox/springfox-swagger-ui
compile group: 'io.springfox', name: 'springfox-swagger-ui', version: '2.9.2'

运行后访问如下地址
http://localhost:8080/swagger-ui.html

user Model

创建 java class modelUser
model-modelUser

@ApiModel(value="User 对象",description="User 对象类的相关描述")
public class modelUser {

@ApiModelProperty(value="user name",name="name",example="小明",required=true)
public String name;
@ApiModelProperty(value="user password",name="password",example="123456",required=true)
public String password;
@ApiModelProperty(value="user email",name="email",example="xm@126.com")
public String email;
@ApiModelProperty(value="user cellphone",name="phone",example="13812811234")
public String phone;
@ApiModelProperty(value="user register date",name="registerDate",example="2018-01-02 08:08:08")
public String registerDate;
@ApiModelProperty(value="user last login date",name="lastLoginDate",example="2018-01-03 08:08:18")
public String lastLoginDate;
@ApiModelProperty(value="user flag, -1 delete,0 not use, 1 active, ",name="flag",example="00",allowableValues = "-1,0,1")
public int flag;
...
}

modelResult 作为返回对象

@ApiModel(value = "Result 对象", description = "Result 对象类的相关描述")
public class modelResult {
@ApiModelProperty(value = "Result code", name = "code", example = "0", required = true)
public Integer code;
@ApiModelProperty(value = "Result message", name = "msg", example = "success", required = true)
public String msg;
@ApiModelProperty(value = "Result timestamp", name = "timestamp", example = "2018-01-01 12:21:12.111", required = true)
public String timestamp;
@ApiModelProperty(value = "Specific data Optional,should be json format", name = "data", example = "null")
public Object datas;
...
}

实现了简单的 CRUD 操作

发布项目

IDEA 右边的 Gradle-build-bootJar 双击即可,然后部署上去 java -jar xx.jar 就可以启动了
如果右边没有发现 Gradle 选项,那么关闭 idea 再重新打开就应该有了。
c298783b.png

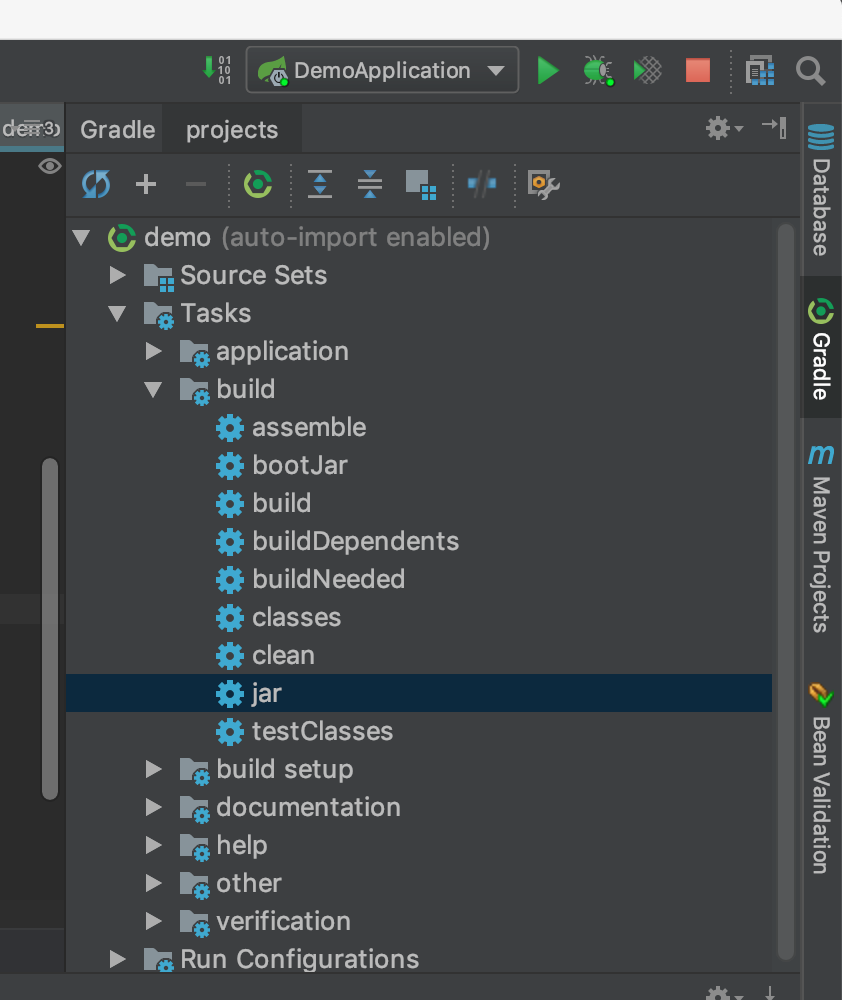
2018 年很忙。读书的速度提升了不少。

3afc6680.png 7ef6414b.png c61b9d4d.png

推荐阅读。
整本书是从科学的角度来找出符合大脑的记忆方式。

有效的方式

方法就是-考试。自己通过间隔性的考试,来增加大脑主动检索知识,加强连接。
间隔性练习更有利于记忆,比如:看一会儿书,练习一会儿吉他
耗费心血的学习才是最有效的,最持久的

错误的方式

  1. 反复阅读课本
75dcc54a.png

简介

总体上分为 broker 和 brokerless 两种
broker 是需要安装中间服务的.

zmq 是属于 brokerless
activemq 两种都有
rabbitmq 是属于 broker

RabbitMQ

is one of the leading implementation of the AMQP protocol (along with Apache Qpid). Therefore, it implements a broker architecture, meaning that messages are queued on a central node before being sent to clients. This approach makes RabbitMQ very easy to use and deploy, because advanced scenarios like routing, load balancing or persistent message queuing are supported in just a few lines of code. However, it also makes it less scalable and “slower” because the central node adds latency and message envelopes are quite big.

ZeroMq

is a very lightweight messaging system specially designed for high throughput/low latency scenarios like the one you can find in the financial world. Zmq supports many advanced messaging scenarios but contrary to RabbitMQ, you’ll have to implement most of them yourself by combining various pieces of the framework (e.g : sockets and devices). Zmq is very flexible but you’ll have to study the 80 pages or so of the guide (which I recommend reading for anybody writing distributed system, even if you don’t use Zmq) before being able to do anything more complicated than sending messages between 2 peers.

ActiveMQ

is in the middle ground. Like Zmq, it can be deployed with both broker and P2P topologies. Like RabbitMQ, it’s easier to implement advanced scenarios but usually at the cost of raw performance. It’s the Swiss army knife of messaging :-).

C++ 11 relative

move semantic

为了提高效率,避免复制构造函数的拷贝动作。

perfect forwarding

会保留参数的左右值类型

template <typename T>
void func(T t) {
cout << "in func " << endl;
}

template <typename T>
void relay(T&& t) {
cout << "in relay " << endl;
func(std::forward<T>(t));
}

smart pointer

  • unique_ptr: 如果内存资源的所有权不需要共享,就应当使用这个(它没有拷贝构造函数),但是它可以转让给另一个unique_ptr(存在move构造函数)。
  • shared_ptr: 如果内存资源需要共享,那么使用这个(所以叫这个名字)。
  • weak_ptr: 持有被shared_ptr所管理对象的引用,但是不会改变引用计数值。它被用来打破依赖循环(想象在一个tree结构中,父节点通过一个共享所有权的引用(chared_ptr)引用子节点,同时子节点又必须持有父节点的引用。如果这第二个引用也共享所有权,就会导致一个循环,最终两个节点内存都无法释放)。

显示地使用shared_ptr构造函数来构造则至少需要两次内存分配。除了会产生额外的开销,还可能会导致内存泄漏。
使用make_shared就不会有这个问题了

// 下面两个是等价的
std::shared_ptr<int> p1(new int(42));
auto p3 = std::make_shared<int>(42);

Lambda

nullptr

关键字 nullptr 是 std::nullptr_t 类型的值,用来指代空指针。nullptr 和任何指针类型以及类成员指针类型的空值之间可以发生隐式类型转换,同样也可以隐式转换为 bool 型(取值为 false)。但是不存在到整形的隐式类型转换。

NULL 的定义是

#ifdef __cplusplus
#define NULL 0
#else
#define NULL ((void *)0)
#endif
比如f(char*)和f(int),参数传NULL的话到底该调用哪个?事实上,在VS下测试这样的函数重载会优先调用f(int),但是f(char *)也是正确的,因此C++引入nullptr来避免这个问题。

range for

int arr[] = {1,2,3,4,5};
for(int& e : arr)
{
e = e*e;
}

设计模式

  • 单例模式
    // 懒汉式单例模式
    class Singleton
    {
    private:
    Singleton() { }
    static Singleton * pInstance;
    public:
    static Singleton * GetInstance()
    {
    if (pInstance == nullptr)
    pInstance = new Singleton();
    return pInstance;
    }
    };

    // 线程安全的单例模式
    class Singleton
    {
    private:
    Singleton() { }
    ~Singleton() { }
    Singleton(const Singleton &);
    Singleton & operator = (const Singleton &);
    public:
    static Singleton & GetInstance()
    {
    static Singleton instance;
    return instance;
    }
    };

const

作用:

  • 修饰变量,说明该变量不可以被改变;
  • 修饰指针,分为指向常量的指针和指针常量;
    常量指针:只能读取内存数据,不能修改内存数据的指针。
    指针常量:是指指针所指向的位置不能改变,即指针本身是一个常量,但是指针所指向的内容可以改变。
  • 常量引用,经常用于形参类型,即避免了拷贝,又避免了函数对值的修改;
  • 修饰成员函数,说明该成员函数内不能修改成员变量。
//定义变量
int a=1;
//定义常量
const int b=2;
//定义常量指针
const int *ptr1=&a;
//定义指针常量,必须赋值
int* const ptr2=&a;

//错误,不能把常量的地址赋给指针变量
int *ptr3=&b;
//正确,可以把常量的地址赋给常量指针
const int* ptr4=&b;
//错误,间接引用常量指针不可以修改内存中的数据
*ptr1=3;
阅读全文 »