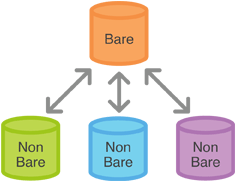
When I first create a repository by git, usually use git init.
But sometimes I see someone use git --bare init, especially I study an article that use bare git repo deploy website.

what’s the difference?

So I do some study with it.

Short answer:
Use a non-bare repository to work locally and a bare repository as a central server/hub to share your changes with other people.

203f8fc3.png

ref

阅读全文 »

SSH(Secure Shell)

SSH 的配置文件有两个:

~/.ssh/config            # 用户配置文件
/etc/ssh/ssh_config # 系统配置文件

~/.ssh/config 文件配置

Host example                       # 关键词
HostName example.com # 主机地址
User root # 用户名
# IdentityFile ~/.ssh/id_ecdsa # 认证文件
# Port 22 # 指定端口

通过执行 $ ssh example 我就可以登录我的服务器。而不需要敲更多的命令 $ ssh root@example.com
又如我们想要向服务器传文件 $ scp a.txt example:/home/user_name。比以前方便多了。

you don’t have permission to capture on that device mac

  1. 终端输入 whoami,查看用户名
  2. 执行下面命令,切换用户
    cd /dev
    sudo chown your_name_here:admin bp*
  3. ls -la | grep bp 应该看到所属用户是指定的

可以运行了

解决大量 TIME_WAIT 问题

netstat -n | awk '/^tcp/ {++S[$NF]} END {for(a in S) print a, S[a]}'
返回:
TIME_WAIT 41735
CLOSE_WAIT 145
FIN_WAIT2 3
ESTABLISHED 413

优化配置

sudo nano /etc/sysctl.conf

添加下面内容:
net.ipv4.tcp_syncookies = 1
net.ipv4.tcp_tw_reuse = 1
net.ipv4.tcp_tw_recycle = 1
net.ipv4.tcp_fin_timeout = 30

参数生效
/sbin/sysctl -p

修改说明:

net.ipv4.tcp_syncookies = 1 表示开启SYN cookies。当出现SYN等待队列溢出时,启用cookies来处理,可防范少量SYN攻击,默认为0,表示关闭;
net.ipv4.tcp_tw_reuse = 1 表示开启重用。允许将TIME-WAIT sockets重新用于新的TCP连接,默认为0,表示关闭;
net.ipv4.tcp_tw_recycle = 1 表示开启TCP连接中TIME-WAIT sockets的快速回收,默认为0,表示关闭。
net.ipv4.tcp_fin_timeout 修改系統默认的 TIMEOUT 时间

TIME_WAIT 状态产生:
客户端与服务器端建立TCP/IP连接后关闭SOCKET后,服务器端连接的端口状态为TIME_WAIT
主动关闭的一方在发送最后一个 ack 后就会进入 TIME_WAIT 状态 停留2MSL(max segment lifetime)时间
这个是TCP/IP必不可少的

需要握手之后才能发送其他命令,握手流程如下:
54cd7de8.png

version<--->verack
ping<--->pong
addr<--->addr
getaddr<--->addr
SendHeaders--->
SendCmpct--->
FEEFILTER--->
GETHEADERS<---> Headers

0.8.6 版本

version<--->verack
ping<--->pong
addr<--->addr
getaddr<--->addr
SendHeaders--->
SendCmpct--->
FEEFILTER--->
getblocks<---->inv
getdata<--->block; spv wallet response merkleblock

Message structure

Field Size Description Data type Comments
4 magic uint32_t Magic value indicating message origin network, and used to seek to next message when stream state is unknown
12 command char[12] ASCII string identifying the packet content, NULL padded (non-NULL padding results in packet rejected)
4 length uint32_t Length of payload in number of bytes
4 checksum uint32_t First 4 bytes of sha256(sha256(payload))
? payload uchar[] The actual data

getheaders

Field Size Description Data type Comments
4 version uint32_t the protocol version
1+ hash count var_int number of block locator hash entries
32+ block locator hashes char[32] block locator object; newest back to genesis block (dense to start, but then sparse)
32 hash_stop char[32] hash of the last desired block header; set to zero to get as many blocks as possible (2000)

API wallet
A wallet that relies on a central server like Electrum could be called an API wallet. This wallet will only connect to one or more servers and speak to the server using the API there. It will implicitly trust what the servers tell it and it won’t download the whole blockchain.

Autotip chrome extension. It’s similar to SPV in that it doesn’t download the whole blockchain, but is different in that not even headers are downloaded.

When an API wallet wants to send bitcoin the following process occurs:

  1. Call to UTXO source (via blockchain.info/blockr.io/blocktrail/etc)
  2. Pass desired UTXO into Transaction library (such as Bitcore or Moneywagon)
  3. Pass in private key to transaction library to sign desired inputs from step 2
  4. Decode transaction object from JS/python/C#/whatever type to hex type.
  5. Send hex data of transaction through PushTX (via blockchain.info/blockr.io/etc)
  6. Short Poll “unconfirmed transaction” until your newly pushed TX gets confirmed.
  7. You are done!

SPV wallet

spv 操作

只下载 headers

SPV verification
https://www.reddit.com/r/Bitcoin/comments/2feox9/electrum_securityprivacy_model/

I am the main developer of Electrum. The original post contains statements that are not true. Electrum does indeed connect to a single server in order to fetch transactions and address histories. However, it also connects to MANY servers in order to fetch block headers, find and verify the longest chain, and verify that all the transactions in its history are consistent with the blockchain, using SPV.

SPV is a way to check that all transactions received by the client are in the blockchain. However, SPV is not a proof of completeness: the client has no proof that it received all the transactions that are relevant to its wallet (the nodes you are talking to could be lying by omission). Electrum currently does not have a way to verify completeness of its history (although this will be addressed soon). Note that clients using bloom filters (Multibit) have exactly the same weakness: they can verify the transactions they receive (using spv), but they lack a proof of completeness too.

One security advantage of Electrumis that servers are authenticated using SSL; this provides protection against MITM attacks, which is a problem for thin clients, including bloom filter clients. However, this advantage comes at the cost of privacy, because the main Electrum server you use knowns which addresses you are using; bloom filter clients have more privacy (although I believe the default setting in Multibit is to favor speed at the expense of privacy).

wallet.cpp

std::vector vpwallets;

抓取指定端口

这个可能没用
// sudo apt install apparmor-profiles

查看 AppArmor 状态
sudo aa-status

tcpdump tcp port 5168 -C 1 -w ./5168.cap

tcpdump -i eth0 -n -w out.pcap -C 1 -Z root
返回 Permission denied
sudo apt-get install apparmor-utils
设置模式
aa-complain /usr/sbin/tcpdump
查看使用的模式
grep tcpdump /sys/kernel/security/apparmor/profiles
返回状态 (enforce) or (complain),需要的是 complain 状态

On going…

Scalable, Instant Bitcoin/Blockchain Transactions

the Lightning Network (LN) is a fix for both transaction costs and speeds. Lightening Network is neither a hard fork or softfork but “an additional layer.” It is a fix that allows for instant low cost transactions for Bitcoin and other coins likelitecoin using a bunch of tricks (it has also been embraced by Ethereum under the name Plasma). The Lightening Network alsoallows for cross platform atomic swaps, meaning one could use it to trade one coin to another without an exchange (for example,Bitcoin to Litecoin). Like SegWit2x, LN is predicated on SegWit’s code change. See details on how LN workshere.

由于 bitcoin 产生区块的时间间隔和区块大小的限制,导致了 bitcoin 的可扩展问题。为了提升交易效率提出了一些解决方案。
lightning network 是其中一个。

区块大小的限制成为瓶颈,导致手续费的上升和处理交易的延迟。

lightning network 是构建于区块链上面的 第二层 支付协议,主要目的是增加交易效率。
通过双向小额支付网络实现不需要资金代理托管的点对点支付系统

通常的使用时通过向相关的区块链提交一笔资金配额交易来打开支付通道,随后可以提交任意笔 Lightning 交易来更新暂定的通道资金配额,
不向区块链发送广播。可选的通过广播通道资金的最终交易来关闭支付通道。

为了实现上面的想法,Lightning 网络需要一种交易可延展性的补丁,例如:bitcoin 的隔离见证 Segregated Witness (SegWit) BIP141

相关历史:
Joseph Poon and Thaddeus Dryja published the Lightning white paper in 2015

编译 xpmpool

安装 gcc 4.9

boost 1.55 版本以下需要使用 gcc 4.9 以下的版本 因为 ABI 兼容性问题导致

// 检查一下版本信息,如果高于 4.9 需要重装
gcc -v
sudo apt-get remove gcc g++
sudo apt-get install gcc-4.9 g++-4.9
// 做一下软连接
cd /usr/bin
sudo ln -s /usr/bin/g++-4.9 /usr/bin/g++ -f
sudo ln -s /usr/bin/gcc-4.9 /usr/bin/gcc -f

gcc -v

详细说明:
This is essentially a won’t fix. compiling boost with gcc5, which uses
C++11 ABI, changes boost ABI and breaks most reverse dependencies.
The boost maintainer decided against backporting fixes to older
boost1.55, and rename the sonames throughout as that would be
non-standard.
Boost 1.58 and later is the default in testing and unstable, and it
uses gcc5 and thus the C++11 ABI.

Thus your options are to use:
(a) gcc4.9 or lower, C++98 ABI, and debian’s boost1.55 or lower.
(b) gcc5 or better, C++11 ABI, and debian’s boost1.57 or better.

编译 boost 1.46.1

// 查看版本
dpkg -s libboost-dev | grep 'Version'
// 如果存在删掉
sudo apt-get --purge remove libboost-*
sudo apt-get --purge remove libboost-dev libboost-doc

sudo apt-get install libbz2-dev

not use icu
libicu-dev

编译可能遇到的问题:

/usr/include/boost/config/requires_threads.hpp:29:4: error: #error "Threading support unavaliable: it has been explicitly disabled with BOOST_DISABLE_THREADS"

这是因为boost是根据编译器的宏定义来判断gcc是否支持多线程,但是gcc 4.7及以上的版本使用的宏与老版本使用的宏不同,这样,boost自然就不能正确获取gcc支持多线程的宏,从而导致不能成功编译boost_thread支持的程序。解决办法是在boost/config/stdlib/libstdcpp3.hpp文件的:

#ifdef __GLIBCXX__ // gcc 3.4 and greater:
# if defined(_GLIBCXX_HAVE_GTHR_DEFAULT) \
|| defined(_GLIBCXX__PTHREADS)

修改为

#  if defined(_GLIBCXX_HAVE_GTHR_DEFAULT) \
|| defined(_GLIBCXX__PTHREADS) \
|| defined(_GLIBCXX_HAS_GTHREADS)

./boost/thread/xtime.hpp:23:5: error: expected identifier before numeric constant
TIME_UTC=1
libs/thread/src/pthread/timeconv.inl

修改 TIME_UTC 为 TIME_UTC_ 和 std 的冲突了

// 下面使用 stage 了这里的 prefix 就无效了
./bootstrap.sh
// 使用这个即可
./bjam --build-dir=/tmp/build-boost toolset=gcc stage


// 这个是安装了 ICU 之后的启用参数,实际操作发现还有问题需要修改,所以暂时不用 ICU
./bjam --build-dir=/tmp/build-boost -sHAVE_ICU=1 -sICU_PATH=/usr/local/include -sICU_LINK="/LIBPATH:/usr/local/lib" toolset=gcc

如果是自定义目录需要添加环境变量
修改/etc/profile, 文件末尾添加

export BOOST_INCLUDE="your install path "/include
export BOOST_LIB="your install path "/lib

在/etc/profile.d/ 中新建一个shell文件boost.sh

#!/bin/sh
export BOOST_INCLUDE_PATH=/home/tyler/Documents/boost_1_46_1
export BOOST_LIB_PATH=/home/tyler/Documents/boost_1_46_1/stage/lib
export BOOST_LIB_SUFFIX=1_46_1

source /etc/profile.d/boost.sh
以后在编译程序的时候,只需要加上 :-I$BOOST_INCLUDE_PATH - L$BOOST_LIB_PATH

卸载
将/usr/local/lib和/usr/local/include/boost两个目录下的文件直接删除就可以。

编译 wt 3.3.2

CMake 2.6,找不到 boost 换 2.8
CMake (>= 2.4), and

./bootstrap
make -j 2
sudo make install
cmake --version

wt3.3.10 需要 cmake 2.12 以上

编译依赖包

  • ZEROMQ message system
  • Google protobuf protocol
  • libwt database abstraction
  • libwt webserver
  • Postgres SQL server

ZEROMQ, czmq, protobuf : ./configure; make; sudo make install;make clean

Postgres SQL server 9.6.9 源码编译

sudo apt-get install libreadline-dev
./configure
make
sudo make install
sudo adduser postgres
sudo mkdir /usr/local/pgsql/data
sudo chown postgres /usr/local/pgsql/data
su - postgres
/usr/local/pgsql/bin/initdb -D /usr/local/pgsql/data
/usr/local/pgsql/bin/postgres -D /usr/local/pgsql/data >logfile 2>&1 &
/usr/local/pgsql/bin/createdb test
/usr/local/pgsql/bin/psql test

然后需要创建数据库

进入控制台
/usr/local/pgsql/bin/psql
创建用户
CREATE USER backend WITH PASSWORD 'XYZPASS';
创建数据库
CREATE DATABASE testdb8 OWNER backend;
赋予权限
GRANT ALL PRIVILEGES ON DATABASE testdb8 to backend;
查看当前库的表
\d
显示表具体信息
\d table_name

编译 wt 需要
使用 CMake 2.8
C++ boost library (preferably version 1.46.1 or higher)

cd wt-x.x.x
mkdir build
cd build
配置
cmake -DBOOST_ROOT=/home/tyler/Documents/boost_1_46_1 -DBOOST_DIR=/home/tyler/Documents/boost_1_46_1 -DBOOST_INCLUDE_DIRS=/home/tyler/Documents/boost_1_46_1 -DBOOST_LIB_DIRS=/home/tyler/Documents/boost_1_46_1/stage/lib -DENABLE_POSTGRES=on -DPOSTGRES_PREFIX=/usr/local/pgsql/ -DWT_CPP_11_MODE=-std=c++11 ../

如果失败了,
ccmake ../
or
cmake-gui ../

编译
make -j 2
sudo make install

编译过程如果有问题:
Linking CXX executable test.sqlite3
../src/Wt/Dbo/backend/libwtdbosqlite3.so.3.3.2: undefined reference to dlopen
../src/Wt/Dbo/backend/libwtdbosqlite3.so.3.3.2: undefined reference to dlclose
../src/Wt/Dbo/backend/libwtdbosqlite3.so.3.3.2: undefined reference to dlerror
../src/Wt/Dbo/backend/libwtdbosqlite3.so.3.3.2: undefined reference to dlsym

检查 libdl.so 是否存在,如果没有安装下面的库
apt install libc6-dev-i386

修改 D:\wt-3.3.2\test\CMakeLists.txt
找到 HAVE_SQLITE,在 TARGET_LINK_LIBRARIES 语句的最后面加上 dl 链接库

compiled library path: /usr/local/lib/

编译 openssl 1.0.2p

openssl version -a

./config --prefix=/usr/local --openssldir=/usr/local/openssl threads zlib shared
make
make test
sudo make install

make clean

如果不指定–prefix和–openssldir, 那么, 生成的文件在
/usr/local/include, /usr/local/lib, /usr/local/ssl这三个目录下
–prefix是指定include和lib install路径
–openssldir是指定bin certs man misc openssl.cnf private的安装路径

export OPENSSL_INCLUDE_PATH=”/usr/local/include/openssl/“
export OPENSSL_LIB_PATH=”/usr/local/lib/“

1.0.1k 版本,如果提示 SSLv2_method 找不到。
修改 ssl/s2_meth.c 文件 77 行,增加下面三个方法原来的三行删掉
参见

IMPLEMENT_ssl2_meth_func(SSLv2_method,
ssl2_accept, ssl2_connect, ssl2_get_method)
#else /* !OPENSSL_NO_SSL2 */

SSL_METHOD *SSLv2_method(void) { return NULL; }
SSL_METHOD *SSLv2_client_method(void) { return NULL; }
SSL_METHOD *SSLv2_server_method(void) { return NULL; }

#endif

编译 primecoind

根据上面编译的配置,修改 makefile.unix 的相关依赖路径

export BOOST_INCLUDE_PATH=/home/tyler/Documents/boost_1_46_1
export BOOST_LIB_PATH=/home/tyler/Documents/boost_1_46_1/stage/lib

需要编译以下berkeley db db-4.8.30.NC

tar -xvf db-4.8.30.NC.tar.gz
cd db-4.8.30.NC/build_unix
mkdir -p build
BDB_PREFIX=$(pwd)/build
../dist/configure --disable-shared --enable-cxx --with-pic --prefix=$BDB_PREFIX
make install
cd ../..

export BDB_LIB_PATH=$BDB_PREFIX/lib
export BDB_INCLUDE_PATH=$BDB_PREFIX/include
export BDB_LIB_SUFFIX=-4.8

进入目录 primeserver/src 执行
make -f makefile.unix > log.txt 2>&1

启动服务

第一次运行需要创建数据库
-initwtdb
矿池手续费地址
-feeaddr
费用计算:
settings->Fee = GetArg("-poolfee", 10);
(block->Value * mSettings->Fee) / 100;

目标值
-target
同步完毕后需要下面的参数启动 primecoind
-gen

export LD_LIBRARY_PATH=$LD_LIBRARY_PATH:/usr/local/lib:/usr/local/pgsql/lib:/home/tyler/Documents/boost_1_46_1/stage/lib
sudo ldconfig

启动 postgreSQL
/usr/local/pgsql/bin/pg_ctl -s -D /usr/local/pgsql/data start -w -t 120


初始化数据库+同步数据
./primecoind -rpcuser=user -rpcpassword=password -printtoconsole -initwtdb -reindex -txindex=1 -addrindex=1 -datadir="/mnt/blocks/primecoin_pool_data"

启动矿池服务
./primecoind -rpcuser=user -rpcpassword=password -printtoconsole -txindex=1 -addrindex=1 -datadir="/mnt/blocks/primecoin_pool_data" -gen

./primecoind -gen -debug -frontport=6667 -host=121.43.185.81 -feeaddr=AVjsWxuvcmjDvULpuegjKbgjrCthi2JVeq -daemon

The webserver needs to be started as:
./webserver --docroot /usr/local/share/Wt --http-address 0.0.0.0 --http-port 80

sudo apt-get remove gcc g++
gcc –version
sudo apt-get install gcc-4.9 g++-4.9
g++-4.9 –version
gcc-4.9 –version