三菱PLC-编程口协议
| 命令(CMD) | 命令码 | 目标设备 |
|---|---|---|
| DEVICE READ | “0” | X,Y,M,S,T,C,D |
| DEVICE WRITE | “1” | X,Y,M,S,T,C,D |
| FORCE ON | “7” | X,Y,M,S,T,C |
| FORCE OFF | “8” | X,Y,M,S,T,C |
| 扩展命令 | 命令码 |
|---|---|
| 读配置 | “E00” |
| 写配置 | “E10” |
| 读程序 | “E01” |
| 写程序 | “E11” |
| 命令 | 16进制代码 | 命令解释 |
|---|---|---|
| ENQ | 05H | 通信请求 |
| ACK | 06H | PLC正确响应 |
| NAK | 15H | PLC错误响应 |
| STX | 02H | 报文开始 |
| ETX | 03H | 报文结束 |
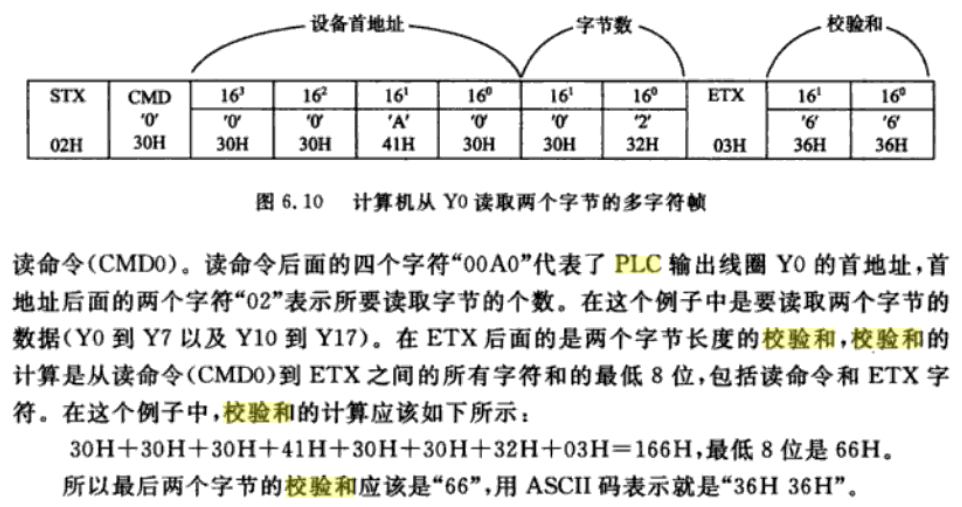
帧格式:
STX CMD DATA …… DATA ETX SUM(upper) SUM(lower)
SUM=CMD+……+ETX
ACK(06H) 接受正確
NAK(15H) 接受錯誤
校验和计算
open
Baud Rate: 115200 StopBits: 1, Parity: Even, DataBits: 7
write:05
read :00
发送 05 连接测试 返回 06 表示正常,其他失败
关闭使用 9600 重新打开
write:02 30 30 45 30 32 30 32 03 36 43
读取 0E02 处 02 字节 (PLC型号)
read :02 30 31 35 46 03 44 46
015F
write:02 30 30 45 43 41 30 32 03 38 45
读取 0ECA 处 02 字节
read :02 43 31 33 46 03 46 30
返回 C13F
write:02 45 30 30 30 45 45 38 30 34 03 46 45
读配置 E00 0EE8 04
read :02 36 30 32 36 38 34 35 43 03 42 35
返回 6026845C
write:02 45 31 30 30 45 45 43 30 34 41 33 34 37 39 32 38 34 03 43 30
写配置 E10 0EEC 04 A3479284
write:02 41 35 03 37 39
read :06
write:A5
read :06
重新打开串口 115200
write:05
read :06
write:02 30 30 45 30 32 30 32 03 36 43
读取 0E02 处 02 字节
read :31 30 31 35 46 03 44 46
1015F ? 这个回复有异常
write:02 30 30 45 43 41 30 32 03 38 45
read :02 43 31 33 46 03 46 30
读取 0ECA 处 02 字节
返回 C13F
write:02 30 30 45 30 32 30 32 03 36 43
read :02 30 31 35 46 03 44 46
读取 0E02 处 02 字节
返回 015F
read :02 43 31 33 46 03 46 30
返回 C13F
write:02 45 30 31 38 30 30 30 30 32 03 44 33
read :02 31 30 30 30 03 43 34
读程序 E01 8000 02
返回 1000
write:02 45 30 31 38 30 34 34 30 43 03 45 43
read :02 30 30 30 30 30 30 30 30 30 30 30 30 30 30 30 30 30 30 30 30 30 30 30 30 03 38 33
读程序 E01 80440C
返回 000000000000000000000000
write:02 45 30 30 38 30 30 30 46 45 03 46 42
read :02 43 38 30 30 30 31 35 46 30 30 41 30 30 30 30 30 30 30 33 30 30 30 33 30 30 30 38 30 30 31 33 30 30 33 41 30 30 30 44 30 30 31 34 30 30 30 35 30 30 31 34 30 30 30 33 30 30 30 41 30 30 30 30 30 30 31 38 30 30 30 30 30 30 30 30 30 30 30 30 30 30 30 30 30 30 30 30 30 30 30 30 30 30 30 30 30 30 30 30 30 30 30 30 30 30 30 30 30 30 30 30 30 30 30 30 30 30 30 30 30 30 30 30 30 30 30 30 30 30 30 30 30 30 30 30 30 30 46 46 46 46 46 46 46 46 46 46 46 46 46 46 46 46 46 46 46 46 46 46 46 46 46 46 46 46 46 46 46 46 30 30 30 30 46 46 46 46 30 30 30 30 30 30 30 30 30 30 30 30 30 30 30 30 30 30 30 30 30 30 30 30 30 30 30 30 30 30 30 30 30 30 30 30 30 30 30 30 30 30 30 30 30 30 30 30 33 39 31 38 30 30 30 30 30 30 30 30 30 30 30 30 30 30 30 30 30 30 30 30 30 30 30 30 30 30 30 30 46 34 30 31 30 30 30 30 30 30 30 30 30 30 30 30 30 30 30 30 30 30 30 30 30 30 30 30 30 30 30 30 30 30 30 30 30 30 30 30 30 30 30 30 30 30 30 30 30 30 30 30 30 30 30 30 30 30 30 30 30 30 30 30 30 30 30 30 30 30 30 30 30 30 30 30 30 30 30 30 30 30 30 30 30 30 30 30 30 30 30 30 30 30 30 30 30 30 30 30 30 30 30 30 30 30 30 30 30 30 30 30 30 30 30 30 30 30 30 30 30 31 31 35 43 31 33 46 34 30 30 30 30 30 30 30 30 30 30 30 30 30 30 30 30 30 30 30 30 30 30 30 30 30 30 30 30 30 30 30 30 30 30 30 30 30 30 30 30 30 30 30 30 30 30 30 30 30 30 30 30 30 30 30 36 30 32 36 38 34 35 43 41 33 34 37 39 32 38 30 41 36 30 30 30 30 30 30 30 30 30 30 30 30 30 30 30 32 30 30 30 33 30 30 30 30 30 30 03 31 34
读配置 E00 8000 FE
返回 C800015F00A00000003000300080013003A000D0014000500140003000A000000180000000000000000000000000000000000000000000000000000000000000000000000FFFFFFFFFFFFFFFFFFFFFFFFFFFFFFFF0000FFFF00000000000000000000000000000000000000000000000039180000000000000000000000000000F401000000000000000000000000000000000000000000000000000000000000000000000000000000000000000000000000000000000000000000000115C13F400000000000000000000000000000000000000000000000000000006026845CA3479280A600000000000000020003000000
write:02 45 30 30 38 30 46 45 30 32 03 46 44
read :02 30 30 30 30 03 43 33
读配置 E00 80FE 02
返回 0000
write:02 30 30 45 30 32 30 32 03 36 43
read :02 30 31 35 46 03 44 46
读取 0E02 处 02 字节
返回 015F
write:02 30 30 45 43 41 30 32 03 38 45
read :31 43 31 33 46 03 46 30
读取 0ECA 处 02 字节
返回 1 C13F
获取 CPU 类型
write:02 30 30 45 30 32 30 32 03 36 43
read :02 30 31 35 46 03 44 46
write 解析:
0 DEVICE READ
0E02 地址 0E02H 处 PLC型号和系统版本号
02 02H 字节数据
read 解析:
返回 015F (FX3UC)
write:02 30 30 45 43 41 30 32 03 38 45
read :02 43 31 33 46 03 46 30
读取 0ECA 处 02 字节
返回 C13F 序列器机种名/版本
FX3UC
F3
读取 D0
write:02 46 35 30 31 31 30 34 30 30 30 03 30 34
read :02 39 37 33 35 03 44 42
write:F5 0110 4000
02 30 42 30 30 03 44 35
写 D0
write:02 45 31 30 34 30 30 30 30 32 30 43 30 30 03 41 32
read :06
E10 4000 02 0C00
命令-地址-长度-数值(小端模式)
读 D1
write:02 46 35 30 31 31 30 34 30 30 32 03 30 36
F5 0110 4002
02 46 35 30 31 31 30 34 30 43 38 03 31 46
F5 0110 40C8
写 D1
write:02 45 31 30 34 30 30 32 30 32 30 42 30 30 03 41 33
E10 4002 02 0B00
read : 06
读 D0-D9 10个字节
write:02 45 30 30 34 30 30 30 31 34 03 44 31
E00 4000 14
write:02 45 30 30 34 30 30 30 31 34 03 44 31
E00 4000 14
02 45 30 30 34 30 30 30 32 38 03 44 36
写多条
02 45 31 30 34 30 30 32 31 34 30 30 30 30 30 30 30 30 30 30 30 30 30 30 30 30 30 30 30 30 30 30 30 30 30 30 30 30 30 30 30 30 30 30 30 30 30 30 30 30 03 35 34
E10 4002 14 0000000000000000000000000000000000000000
D0 写入 20个字节
write:02 45 31 30 34 30 30 30 32 38 31 34 31 34 31 34 31 34 31 34 43 44 43 44 43 44 43 44 43 44 43 44 43 44 43 44 43 44 43 44 43 44 43 44 43 44 43 44 43 44 43 44 43 44 43 44 43 44 43 44 43 44 43 44
E10 4000 28 1414141414CDCDCDCDCDCDCDCDCDCDCDCDCDCDCDCDCDCDCDCDCDCD
02 45 31 30 34 30 30 30 32 38 30 39 30 39 30 39 30 39 30 39 30 39 30 39 30 39 30 39 30 39 30 39 30 39 30 39 30 39 30 39 30 39 30 39 30 39 30 39 30 39 30 39 30 39 30 39 30 39 30 39 30 39 30 39
E10 4000 28 090909090909090909090909090909090909090909090909090909
D1 写入 10个字节
02 45 31 30 34 30 30 32 31 34 30 39 30 39 30 39 30 39 30 39 30 39 30 39 30 39 30 39 30 39 30 39 30 39 30 39 30 39 30 39 30 39 30 39 30 39 30 39 30 39 03 30 38
E10 4002 14 0909090909090909090909090909090909090909
读 10 个字节
02 45 30 30 34 30 30 32 31 34 03 44 33
E00 4002 14
02 30 39 30 39 30 39 30 39 30 39 30 39 30 39 30 39 30 39 30 39 30 39 30 39 30 39 30 39 30 39 30 39 30 39 30 39 30 39 30 39 03 33 37
0909090909090909090909090909090909090909
读 20 个字节
02 45 30 30 34 30 30 30 32 38 03 44 36
02 34 38 30 39 30 39 30 39 30 39 30 39 30 39 30 39 30 39 30 39 30 39 30 39 30 39 30 39 30 39 30 39 30 39 30 39 30 39 30 39 30 39 30 39 30 39 30 39 30 39 30 39 30 39 30 39 30 39 30 39 30 39 30 39 30 39 30 39 30 39 30 39 30 39 30 39 30 39 30 39 03 36 45
48 090909090909090909090909090909090909090909090909090909090909090909090909090909
write:02 45 31 30 34 30 30 32 30 32 30 39 30 30 03 39 41
E10 4002 02 0900
write:02 45 31 30 34 30 30 34 30 32 30 38 30 30 03 39 42
E10 4004 02 0800
write:02 45 31 30 34 30 30 36 30 32 30 37 30 30 03 39 43
E10 4006 02 0700